Renesas(瑞萨)
显示原文
Renesas is an official partner of LVGL. Therefore, LVGL contains built-in support for Dave2D (the GPU of Renesas) and we also maintain ready-to-use Renesas projects.
Renesas 是 LVGL 的官方合作伙伴。因此,LVGL 包含对 Dave2D 的内置支持( Renesas 的 GPU)同时我们也维护着即用型的瑞萨项目。
Dave2D(Dave2D)
显示原文
Dave2D is capable of accelerating most of the drawing operations of LVGL:
Rectangle drawing, even with gradients
Image drawing, scaling, and rotation
Letter drawing
Triangle drawing
Line drawing
As Dave2D works in the background, the CPU is free for other tasks. In practice, during rendering, Dave2D can reduce the CPU usage by half or to one-third, depending on the application.
Dave2D 能够加速 LVGL 的大部分绘图操作:
矩形绘制,即使有渐变
图像绘制、缩放和旋转
字母图画
三角形画法
画线
由于 Dave2D 在后台运行,因此 CPU 可用于其他任务。实际上,在渲染过程中,Dave2D 可以将 CPU 使用率减少一半或三分之一,具体取决于应用程序。
GLCDC
显示原文
GLCDC is a multi-stage graphics output peripheral available in several Renesas MCUs. It is able to drive LCD panels via a highly configurable RGB interface.
More info can be found at the dirver's page.
GLCDC 是一种多级图形输出外设,可用于多个瑞萨电子微控制器(MCU)中。 它能够通过一个高度可配置的 RGB 接口驱动 LCD 面板。
更多信息可以在 驱动页面 中找到。
Supported boards(认证板)
EK-RA8D1 |
EK-RA6M3G |
RX72N Envision Kit |
|
CPU |
480MHz, Arm Cortex-M85 core |
120MHz, Arm Cortex-M4 core |
240MHz, Renesas RXv3 core |
Memory |
1MB internal, 64MB external SDRAM
2MB internal, 64MB External Octo-SPI Flash
|
640kB internal SRAM
2MB internal, 32MB external QSPI Flash
|
1MB internal SRAM
4MB internal, 32MB external QSPI Flash
|
Display |
4.5”
480x854
2-lane MIPI
|
4.3”
480x272
Parallel RGB565
|
4.3”
480x272
Parallel RGB565
|
Board video |
|||
Links |
Get started with the Renesas ecosystem(开始使用瑞萨电子生态系统)
显示原文
RA Family
The official IDE of Renesas is called e² studio. As it's Eclipse-based, it runs on Windows, Linux, and Mac as well. The RA family requires the latest version with FSP 5.3. It can be downloaded here.
JLink is used for debugging, it can be downloaded here.
Clone the ready-to-use repository for your selected board:
git clone https://github.com/lvgl/lv_port_renesas_ek-ra8d1.git --recurse-submodules
Downloading the .zip from GitHub doesn't work as it doesn't download the submodules.
Open e² studio, go to
File->Import projectand selectGeneral/Existing projects into workspaceBrowse the cloned folder and press
Finish.Double click on
configuration.xml. This will activate the Configuration Window.Renesas' Flexible Software Package (FSP) incudes BSP and HAL layer support extended with multiple RTOS variants and other middleware stacks. The components will be available via code generation, including the entry point of "main.c".
Press
Generate Project Contentin the top right corner.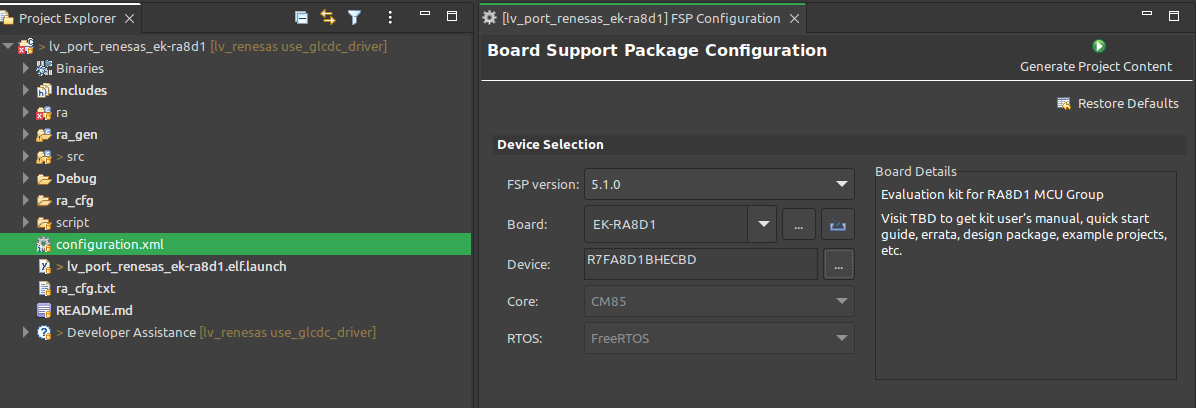
Build the project by pressing
Ctrl+Alt+BClick the Debug button (
 ). If prompted with Debug Configurations, on the Debugger tab select the
 J-Link ARMas Debug hardware and the proper IC as Target Device:R7FA8D1BHfor EK-RA8D1
R7FA6M3AHfor EK-RA6M3G
备注
On EK-RA8D1 boards, the SW1 DIP switch (middle of the board) 7 should be ON, all others are OFF.
RX Family
The official IDE of Renesas is called e² studio. As it's Eclipse-based, it runs on Windows, Linux, and Mac as well. It can be downloaded here.
Download and install the required driver for the debugger
for Windows: 64 bit here and 32 bit here
for Linux: here
RX72 requires an external compiler for the RXv3 core. A free and open-source version is available here after a registration.
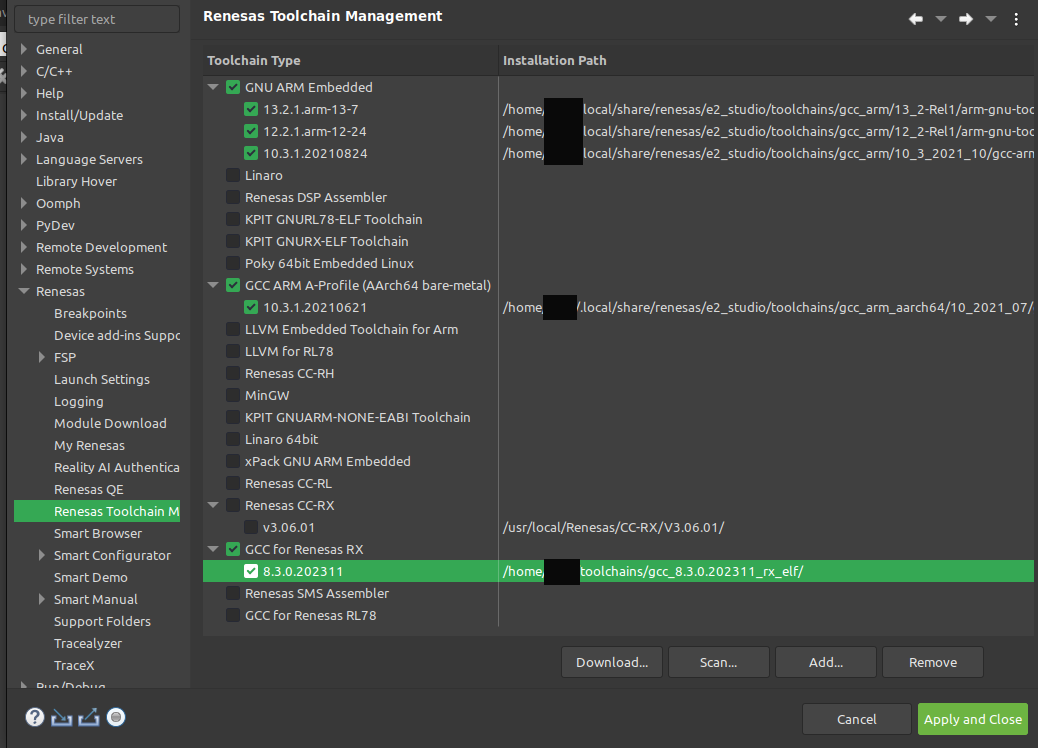
The compiler must be activated in e² studio:
Go to go to
Help->Add Renesas ToolchainsPress the
Add...buttonBrowse the installation folder of the toolchain
Clone the ready-to-use lv_port_renesas_rx72n-envision-kit repository:
git clone https://github.com/lvgl/lv_port_renesas_rx72n-envision-kit.git --recurse-submodules
Downloading the .zip from GitHub doesn't work as it doesn't download the submodules.
Open e² studio, go to
File->Import projectand selectGeneral/Existing projects into workspaceSelect the cloned folder and press
Finish.Double click on
RX72N_EnVision_LVGL.scfg. This will activate the Configuration Window.Renesas' Smart Configurator (SMC) incudes BSP and HAL layer support extended with multiple RTOS variants and other middleware stacks. The components will be available via code generation, including the entry point of the application.
Press
Generate Codein the top right corner.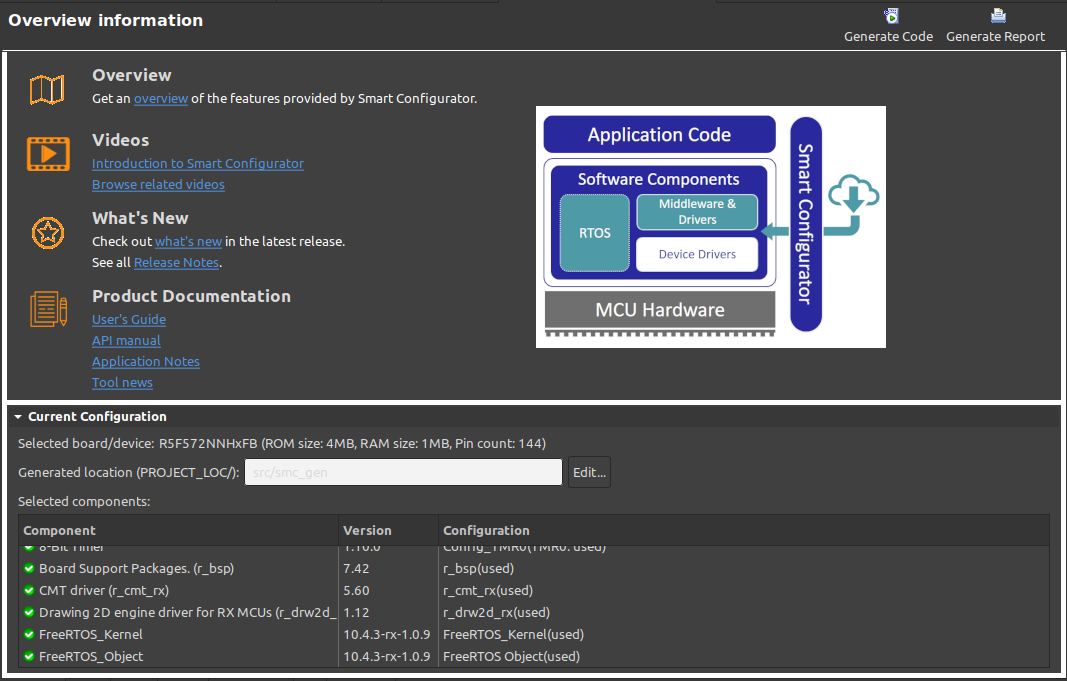
Build the project by pressing
Ctrl+Alt+BClick the Debug button (
). If prompted with Debug Configurations, on the Debugger tab select the E2 Liteas Debug hardware andR5F572NNas Target Device: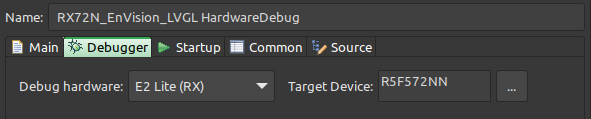
备注
Make sure that both channels of SW1 DIP switch (next to ECN1) are OFF.
RA Family
瑞萨官方的集成开发环境(IDE)被称为e² studio。由于它基于Eclipse,因此可以在Windows、Linux和Mac上运行。RA系列需要带有FSP 5.3的最新版本。可以在 这里 下载.
JLink用于调试,可以在 这里 下载.
克隆你选择的板子的现成代码库:
从GitHub下载 zip 文件是不行的,因为它不会下载子模块。.
打开e² studio,转到文件 -> 导入项目,然后选择通用 / 将现有项目导入工作区
浏览克隆的文件夹,然后按完成。
-双击 configuration.xml 。这将激活配置窗口。
瑞萨的灵活软件包(FSP)包括BSP和HAL层支持,并扩展了多个RTOS变体和其他中间件堆栈。 组件将通过代码生成提供,包括 "main.c" 的入口点。
点击右上角的生成项目内容
Generate Project Content。
通过按
Ctrl+Alt+B构建项目- 点击调试按钮()。如果提示调试配置 Debug Configurations,在调试器 Debugger 标签页选择
J-Link ARM作为调试硬件 Debug hardware ,选择适当的IC作为目标设备 Target Device: 对于EK-RA8D1,选择
R7FA8D1BH
对于EK-RA6M3G,选择
R7FA6M3AH
- 点击调试按钮(
备注
在EK-RA8D1板上,中间的 SW1 DIP开关(板子中间)7号应该打开,其他都关闭。
RX Family
瑞萨官方的集成开发环境(IDE)被称为e² studio。由于它基于Eclipse,因此可以在Windows、Linux和Mac上运行。可以在 这里 下载.
下载并安装调试器所需的驱动程序
RX72需要一个外部编译器用于RXv3核心。一个免费且开源的版本可在注册后 这里 获得。
克隆现成的 lv_port_renesas_rx72n-envision-kit 代码库:
git clone https://github.com/lvgl/lv_port_renesas_rx72n-envision-kit.git --recurse-submodules
从GitHub下载 .zip 文件是不行的,因为它不会下载子模块。
打开e² studio, 转到
File->Import project并选择General/Exsisting projects into workspace选择克隆的文件夹并按
Finish.双击
RX72N_EnVision_LVGL.scfg. 这将激活 Configuration Window.瑞萨的智能配置器(SMC)包括BSP和HAL层支持,并扩展了多个RTOS变体和其他中间件堆栈。 组件将通过代码生成提供,包括应用程序的入口点
点击右上角的
Generate Code生成代码。
通过按
Ctrl+Alt+B构建项目点击调试按钮(
)。如果提示 Debug Configurations,在 Debugger 标签页选择 E2 Lite作为 Debug hardware ,选择R5F572NN作为 Target Device 目标设备:
备注
确保 SW1 DIP开关(在 ``ECN1``旁边)的两个通道都处于关闭状态。
Modify the project(修改项目)
Open a demo(打开演示)
显示原文
The entry point of the main task is contained in src/LVGL_thread_entry.c in all 3 projects.
You can disable the LVGL demos (or just comment them out) and call some lv_example_...() functions, or add your custom code.
所有3个项目中,主任务的入口点包含在 src/LVGL_thread_entry.c 文件中。
您可以禁用 LVGL 演示(或者只是注释掉它们),并调用一些 lv_example_...() 函数,或者添加您的自定义代码。
Configuration(配置)
显示原文
src/lv_conf.h contains the most important settings for LVGL. Namely:
LV_COLOR_DEPTHto set LVGL's default color depthLV_MEM_SIZE toset the maximum RAM available for LVGLLV_USE_DAVE2Dto enable the GPU
Hardware and software components can be modified in a visual way using the Configuration Window.
src/lv_conf.h 包含 LVGL 最重要的设置。即:
LV_COLOR_DEPTH用于设置 LVGL 的默认颜色深度LV_MEM_SIZE to用于设置 LVGL 可用的最大 RAMLV_USE_DAVE2D用于启用 GPU 配置.硬件和软件组件可以通过使用 Configuration Window 以可视化的方式进行修改。
Support(支持)
显示原文
In case of any problems or questions open an issue in the corresponding repository.
如果遇到任何问题或疑问,请在相应的代码库中提出一个问题。